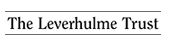
Home > Catalogue > Browse > Harmony in Blue and Gold: The Peacock Room << >>

The Peacock Room at 49 Prince's Gate, photograph, 1877?, S. P. Avery Collection, New York Public Library

H. Dixon & Son, 'The Peacock Room at 49 Prince's Gate', photograph, ca 1890, private collection

Photogravure after H. Dixon & Son, from Harper’s New Monthly Magazine, Dec. 1890

J. E. Mitchell after Whistler, 'The Peacock Room', engraving, The Art Journal, 1892

J. E. Mitchell after Whistler, 'Shutter in the dining Room', engraving, The Art Journal, 1892

The Peacock Room at the Freer Gallery of Art, Washington, DC, 1920s

The Peacock Room during restoration, 1947, Freer Gallery of Art

North-western corner of the Peacock Room during restoration, 1947, Freer Gallery of Art

North wall of the Peacock Room, ca 1980, Freer Gallery of Art

Detail of the ceiling during the 1990s restoration, Freer Gallery of Art

Harmony in Blue and Gold: The Peacock Room, Freer Gallery of Art

La Princesse du pays de la porcelaine, north wall of the Peacock Room, Freer Gallery of Art

Shutters of the Peacock Room with peacock decoration, Freer Gallery of Art

Two Peacocks, from G. A. Audsley & J. Lord Bowes, Keramic Art of Japan, 1875, plate L

The Rich Peacock and the Poor Peacock, south wall of the Peacock Room, Freer Gallery of Art

North wall of the Peacock Room, Freer Gallery of Art

North-eastern corner of the Peacock Room, Freer Gallery of Art

North-eastern corner of the Peacock Room, Freer Gallery of Art

Designs for the arrangement of china in the dining room at Aubrey House, British Museum

Peacock Designs, British Museum

Three Peacock shutters, New York Public Library

Fighting Peacocks, New York Public Library

Sketches of the Peacock Room, The Hunterian

Fighting Peacocks, Glasgow University Library

Cartoon of rich and poor Peacocks, The Hunterian

The walls of the Peacock Room, Isabella Stewart Gardner Museum

Window in the Peacock Room, Isabella Stewart Gardner Museum

Peacock shutters Isabella Stewart Gardner Museum

Fighting Peacocks, Isabella Stewart Gardner Museum

Sketch of the Peacock Room, Art Institute of Chicago

Sketch of a Peacock shutter and fighting Peacocks, Library of Congress

Osborn & Mercer, The Peacock Room, sale catalogue, 1892
Whistler was annoyed at the numerous reproductions of the Peacock Room published in 1892 after F. R. Leyland's death, such as the engraving published in the Art Journal showing the room with the porcelain in place. 1 In a letter to David Croal Thomson (1855-1930) in 1892 he proposed the publication of an album of reproductions of the room in gold and blue. 2 He also asked Thomson to send the reproductions published in June 1892 in the Pall Mall Budget to him in Paris. 3 When the Peacock Room was exhibited by Obach & Co. in London in 1904, Leyland's collection had long been sold and A. T. Hollingsworth lent Nankin porcelain to put on the shelves. It was probably this collection, and not Leyland's porcelain, which appears in the final photograph of the room in the catalogue published by Obach. 4 A set of photographs of the room, with porcelain in place, was made by Bedford Lemere (National Monuments Record), probably in 1904.
Last updated: 20th May 2021 by Margaret